Refinement of Piston Friction Parameters in a Smooth Barrel
Abstract—
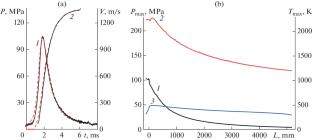
This article describes fine tuning of wear diagnostics of a laboratory smooth barrel with a length of 5 m and diameter of 30 mm during tests. The devices are developed for measurements of internal diameter and force of pulling a piston prototype through the entire barrel length. An analog–digital instrument for measurement of internal diameter allows one to detect and to measure defects of arbitrary deformed barrel. The dimensions of the sensors used in the device allow us to scale it up for measurements of barrel of both lower and higher diameter. The device of force measurements allows us to estimate the friction parameters before experiments to clarify the mathematical model of gas dynamic processes accompanying the shot and to adjust loading conditions, if necessary. It has been demonstrated that their use allows us to estimate wear and to diagnose the state of the barrel system. Significant broadening of bore on the side of the breech end of the barrel has been detected. There is a correlation of measured data from both instruments. A ballistic experiment has been carried out using the updated measuring and recording complex. On the basis of the results the friction parameters of the piston–barrel couple obtained before the experiments have been accounted in the mathematical model of gas dynamic processes. This has allowed us to reduce the number of matching parameters upon simulation and to perform more accurate analysis of gas dynamic processes accompanying a shot with plotting respective time dependences of piston pressure and speed as well as distribution of maximum gas temperatures and pressure along the barrel length. Thus, the coefficient of the law of gunpowder burning has increased by 10%.


 求助内容:
求助内容: 应助结果提醒方式:


